Welcome to Fookes Software’s support portal
How to search Outlook PST files (with or without Outlook)
Aid4Mail makes it easy to search Outlook PST files. Compared to competing tools:
- Aid4Mail is faster.
- More accurate with no data loss.
- Offers more control over the conversion process and search query.
Many tools claim to search Outlook PST files but be aware of lost metadata, folder hierarchy and status information. Also Aid4Mail is able to search all emails and attachments of emails. Aid4Mail can even search files contained in zipped files (that are attachments).
This article will show you how to search a Microsoft Outlook PST files using Aid4Mail. Keep in mind that we have been developing Aid4Mail for over 20+ years and have lots of experience searching MS Outlook PST files.
Please follow the steps below. For any setting that’s not specifically mentioned, you can either use the default (preset) value or consult the Aid4Mail user guide for details.
Step 1: Open Aid4Mail’s settings
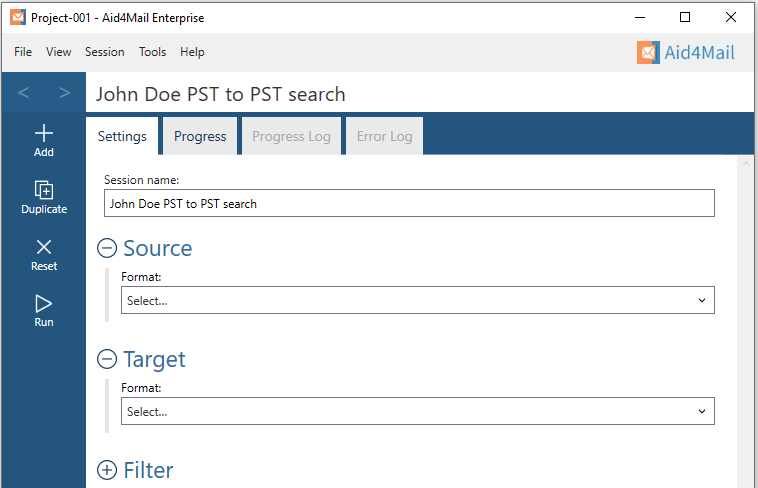
- In Aid4Mail, select the Settings tab.
- Update the Session name to so it describes for the task at hand. In this example, we will be search and converting John Doe’s PST file to PST so we’ve entered John Doe PST to PST search as the session name. In this example, we are converting the results to a new PST file but you can convert the results from the search to any of the supported Target formats in Aid4Mail.
- Below the session name there are three sections: Source, Target and Filter. Each can be displayed or hidden by selecting the +/- symbol next to the section heading. This tutorial requires them all to be displayed.
Step 2: Set PST as your source
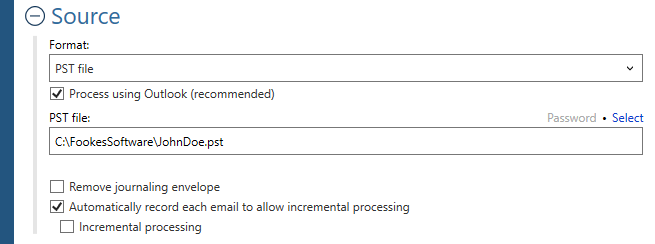
- In the Format list, select PST.
- Choose whether to Process using Outlook. This means using Outlook’s internal engine (MAPI) to open and read the PST file. Using Outlook’s engine is faster but requires Outlook to be installed on the same computer as Aid4Mail. If you don’t have Outlook installed, turn this option off.
- Set the Location of your PST file, either writing it directly in the PST file: field or by using the Select button to browse your file system.
- Choose whether to Remove journaling envelope if your email files are journaled.
Step 3: Set a PST file as your target
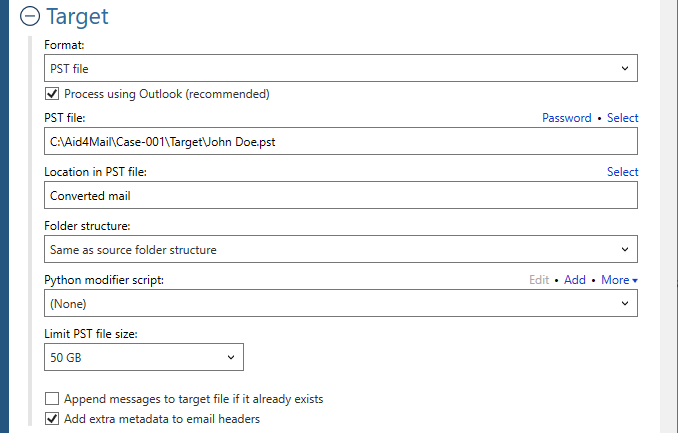
- In the Format list, select PST file.
- Choose whether to Process using Outlook. This means using Outlook’s internal engine (MAPI) to create the PST file. Using Outlook’s engine is faster but requires Outlook to be installed on the same computer as Aid4Mail. If you don’t have Outlook installed, keep this option off.
- Specify where you want your PST file to be saved. You can write directly in the field or use the Select button to browse your file system. You can also set a Password to protect the file.
- Optionally, set a folder Location in PST file. This is a folder inside the PST file where your converted mail will be saved. In our example, we have set a folder called Converted mail. This folder doesn’t exist yet but Aid4Mail will create it. Any emails that meet you filter criteria will be saved under the Converted mail folder (in the same folder structure as your source PST file).
- Select an option for the Folder structure of the exported mail. Usually you’ll want to keep it the same as the original, so choose Same as source folder structure.
- Decide whether to Limit PST file size. In our example, we’ve set it to 50GB which is the maximum file size allowed by Outlook by default. Once the file has reached its limit, newly converted emails will overflow into a second PST file. And when that one’s full then into a third PST file, and so on.
- If you want to add to an existing PST file, choose Append messages to target file if it already exists.
- Add extra metadata to email headers when your chosen target format or settings would otherwise result in data loss. For example, if the target format doesn’t support some of the source format’s header fields. Or if the original folder structure would be lost due to your settings. With this option, the data is not lost but instead added to the email headers.
Step 4: Set your filter criteria

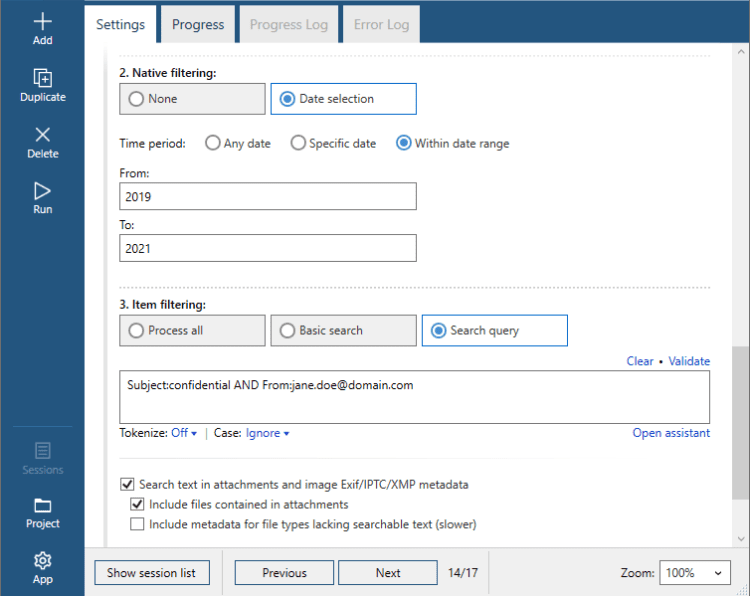
- Under Folder filtering, pick Folder selection. Your PST folder structure will appear in the box below. Select the folders you want Aid4Mail to process. The others will be skipped. We also highly recommend turning-on the option “Include hidden system folders”. This will make sure Aid4Mail searches all of the hidden folders in the PST file including the Recoverable items folders and other MS Exchange items.
- Under Native filtering, add a date range that you want to search if necessary. Native Filtering is only available when the option “Process using Outlook (recommended)”under Source is turned-on. If you do not have Outlook installed on the machine, you can still add a date range under Item filtering.
- Under Item filtering, add your filter criteria. You can use the assistant and search operators to help you. In the example above, Aid4Mail will search for confidential in the subject of the emails and for jane.doe@domain.com in the From: header field. If both of those items are found in an email, Aid4Mail will process the email to the new PST file. Aid4Mail has the capability to search the header, body, attachments and files contained in zipped files. In the Search query field, you can use Boolean operators, proximity operators, wildcards, regular expressions and more. The detailed Aid4Mail user guide provides information over all of the filtering capabilities.
Step 5: Run your PST to PST search
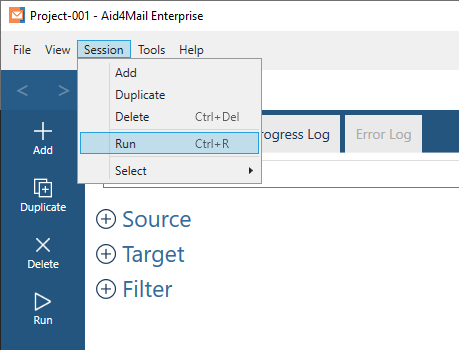
Select the Run button or Session > Run from the menu. Aid4Mail will search and convert the emails that contain your filter criteria to your chosen PST file. It will automatically open the Progress tab so you can monitor what’s going on. Once finished, you will find full reports in the Progress log and, if relevant, the Error log.
Step 6: Open the PST file in Outlook
You can do this by selecting File > Open > Outlook Data File from Outlook’s main menu (older versions of Outlook may use different menu names).
That’s it!
We hope you found this tutorial helpful in showing you why Aid4Mail is the best tool to search PST files on the market. Aid4Mail even allows you to search PST files without Outlook being installed. You can even search through PST files concurrently at the same time if you have multiple PST files. If you have any questions on how to search PST files, get in touch with us.
If you’re looking for further information, first take a look through the Aid4Mail user guide and our knowledge base articles.
If you still have questions, don’t hesitate to contact our award-winning Helpdesk.
If you’d like to buy an Aid4Mail license, please visit the online store.
Or if you’d like to try Aid4Mail first before purchasing, download a free trial and run your own tests searching Outlook PST files with Aid4Mail. We want you to have full confidence in Aid4Mail!